
Guide onboarding with a talking mascot
Build Fold’s three-step setup with Nori, a paper manta ray. The visitor names a workspace, creates a project, and sees the finished result. Nori speaks one short, captioned line at each stage.
Good things start here.
Reference prompts and Masko v1 recipe · Download the full React examples
What you will build
A responsive web interface with a new brand character, working interactions and transparent video playback. This tutorial uses Fold, a fictional product. The demo is free to try; generating your own assets spends your Masko credits.
What you need: a React app, a Masko account, and a mascot’s published files or local downloads. Use Studio for generation, or keep a write API key on your server. Never ship the key in browser code.
Create Nori for your brand
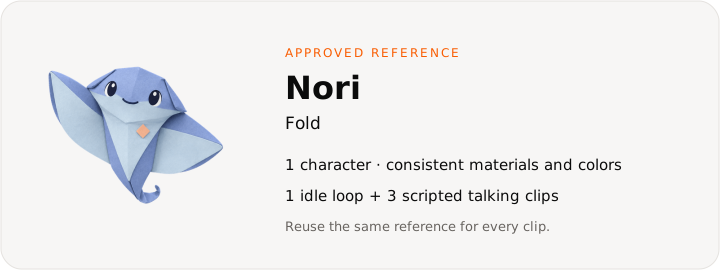
Copy this reference prompt:
A friendly origami manta ray made of periwinkle and ivory folded paper, large dark eyes, a small apricot badge, soft tactile paper, calm smile, full character centered, no text or extra objects.A little paper manta ray with a calm voice and an apricot badge. Nori makes a blank workspace feel less intimidating.
Create the reference in Studio, or follow Create a mascot from text. Keep the approved image as the mascot’s reference so future poses share its identity. The downloaded examples include the completed demonstration media; replace the files when you make your own character.
Map the interaction states
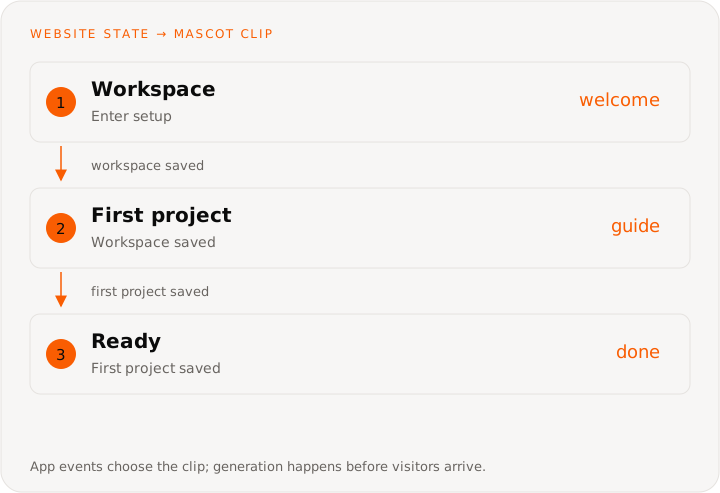
Keep the form step separate from the clip. Failed validation or a failed save leaves the visitor on the current screen. In this demo, a talking clip plays once and holds its last frame until the next step; Hear Nori replays the current clip with sound. The idle loop is available in the source for a quieter resting state.
These are website interaction states. Masko v1 creates the media; your app chooses which clip to show. Copy the v1 requests for character creation, generation and file delivery.
Make the animation set
| Clip or moment | Performance or spoken line | Trigger |
|---|---|---|
| Welcome | “Hi, I’m Nori. Let’s make a little space for your next big idea.” | Enter the first screen |
| Guide | “Give your first project a name. One small step, and you’re ready to go.” | Workspace name accepted |
| Done | “Your first project is ready. You’ve got this!” | First project created |
Create a five-second idle loop from your approved image. Keep the camera still and the full character inside the frame. Then make the three talking clips below.
Gentle breathing, one friendly blink and a tiny paper-wing sway. Keep the full character centered and the camera still. End in the starting pose for a seamless loop.Animate an existing image to avoid paying for a new pose when you already have the right one. Inspect the results before putting them in your interface.
Give Nori a voice and record the lines
In Studio, open Context & References → Voice → Add a voice. Try this description:
A calm, clear adult voice. Warm, lightly playful, unhurried conversational English.Hear the samples and keep one. Each voice sample set costs 1 credit. For each line in the recipe table, create a Talking animation from the welcome pose. Add movements in brackets, such as [waves gently, warm], and request a cost estimate before generating.
For an API or coding agent, use the talking tutorial for voice samples, voice selection and job polling. Once the mascot has a voice, this request estimates one clip:
// Run on your server. Keep this helper out of browser code.
async function masko(path: string, body: object, operationId: string) {
  const response = await fetch(`https://api.masko.ai/v1${path}`, {
    method: 'POST',
    headers: {
      Authorization: `Bearer ${process.env.MASKO_API_KEY}`,
      'Content-Type': 'application/json',
      'Idempotency-Key': operationId
    },
    body: JSON.stringify(body)
  });
  const result = await response.json();
  if (!response.ok) throw new Error(result.error?.message ?? 'Request failed');
  return result.data;
}

const request = {
  type: 'animation',
  item_id: welcomeItemId,
  speech: {
    script:
      '[waves gently, warm] Hi, I’m Nori. Let’s make a little space for your next big idea.'
  }
};
const estimate = await masko(
  `/mascots/${mascotId}/generate`,
  {
    ...request,
    dry_run: true
  },
  crypto.randomUUID()
);
// Review estimate.estimate before sending the paid request.
// Use a unique Idempotency-Key and the identical body on retries.
Generate your actual scripted lines from the table, not the example greeting above. Wait for the job and its WebM and HEVC files to complete before adding the result to the app.
Get files that are ready to ship
Download the transparent PNG, WebM and HEVC files into your project, or publish them to get stable CDN URLs. A completed MP4 alone is not proof that the transparent versions are ready: check the assets you intend to serve. Signed private URLs expire and should not be hardcoded into a shipped app.
The source download uses /website-use-cases/ for media. Copy that directory to your app’s public/ folder, or change the URLs in website-mascots.ts to your published files. WebM serves Chrome, Firefox and Edge; HEVC with alpha serves Safari.
Connect it to your web app
Keep setup state in the app. Advance only after validation succeeds. In production, wait for the backend to create the workspace or project before changing the step; if it fails, keep the form open with a useful error.
This small component shows the event wiring with local state. The source download includes the complete layout and production integration points.
import { useState, type FormEvent } from 'react';
import { WebsiteMascotPlayer } from './WebsiteMascotPlayer';
import { websiteMascotStories } from './website-mascots';

const nori = websiteMascotStories[0];
const clips = ['welcome', 'guide', 'done'];
const captions = [
  'Hi, I’m Nori. Let’s make a little space for your next big idea.',
  'Give your first project a name. One small step, and you’re ready to go.',
  'Your first project is ready. You’ve got this!'
];

export function SetupGuide() {
  const [step, setStep] = useState(0);
  const [workspace, setWorkspace] = useState('');
  const [project, setProject] = useState('');

  function submit(event: FormEvent) {
    event.preventDefault();
    const name = step === 0 ? workspace : project;
    if (name.trim()) setStep((previous) => previous + 1);
  }

  return (
    <section>
      <WebsiteMascotPlayer name="Nori" clip={nori.clips[clips[step]]} />
      <p aria-live="polite">{captions[step]}</p>
      {step < 2 ? (
        <form onSubmit={submit}>
          <label htmlFor="setup-name">
            {step === 0 ? 'Workspace name' : 'First project'}
          </label>
          <input
            id="setup-name"
            required
            value={step === 0 ? workspace : project}
            onChange={(event) =>
              step === 0
                ? setWorkspace(event.target.value)
                : setProject(event.target.value)
            }
          />
          <button type="submit">Continue</button>
        </form>
      ) : (
        <p>
          {workspace}: {project} is ready.
        </p>
      )}
    </section>
  );
}
The downloaded demo contains the project form, back navigation, completion view and reset control. Put the spoken text next to the mascot, and keep the instruction beside the field. A screen reader can follow the flow without hearing the video.
Use the full design and player
Download the React source and generated media. It contains all three independent designs. Choose onboarding for this tutorial:
import { WebsiteMascotDemo } from './WebsiteMascotDemo';

export default function Example() {
  return <WebsiteMascotDemo kind="onboarding" />;
}
The archive includes the components, CSS module, media configuration, browser format selector and a README. No Masko SDK is needed for playback. Import the CSS module beside the components and keep your app’s existing React setup.
The player keeps two video elements mounted. It prepares the next clip and swaps only after a decoded frame exists, so the visible character remains while a new animation loads. A one-shot completion follows ended, not an estimated timer. See smooth playback for the transition contract.
Sound starts muted. Visitors can enable it explicitly, and spoken lines remain visible as text. Playback pauses offscreen and when the browser tab is hidden. With reduced motion, the character stays still until the visitor asks to play it.
Check the finished experience
Submit an empty or whitespace-only name: the step must stay put. Create a workspace, go back, and check that the name is preserved. Create the project and check that both names appear in the result. Replay each spoken line, mute it, then complete setup using only the keyboard.
Test muted, with sound, with reduced motion, and with a keyboard. Check a narrow mobile viewport and both WebM and Safari’s HEVC playback. A failed media request should leave the still image or previous frame visible and offer a retry.
Connect your real product
Save setup to the signed-in account and restore the correct step after a reload. Keep essential instructions in text. Let returning users skip a guide they have already completed.
Costs and what to measure
Budget 1 credit for the reference image, 10 for a five-second Standard idle loop from that image, 1 for a voice sample set, and 2 credits per second of talking. Three talking clips have a five-second minimum each, so this recipe starts at about 42 credits; the longer scripts in this example cost more. Use the talking estimate for your own lines.
Exports and playback of downloaded or published files add no generation cost. The tutorial catalog shows estimates, not the cost of a visitor’s session.
Compare setup completion, time to first project and next-day return rate with and without the guide. This demo illustrates the experience; it does not report a conversion lift.
Ask Lovable to build your version
Build a project planning web app called Fold with a calm blue design. Use Masko to create Nori, a friendly paper manta ray. Add a three-step onboarding guide with captioned talking clips for welcome, the next setup step and completion. Let users name their workspace and create their first project. Keep sound optional and never cover the form.

Follow https://masko.ai/docs/tutorials/web-onboarding-mascot.
Use Masko v1 at https://api.masko.ai/v1 and inspect https://api.masko.ai/v1/openapi.json.
Use real generated files, keep generation credentials on the server,
and download or publish assets before shipping the app.
Reference prompts and Masko v1 recipe · All website use cases